Popper lures are some of the most common and popular types of lures to use for fly-fishing and spin fishing.
These specifically-designed lures are meant to mimic the appearance of a piece of bait on the surface of the water, which makes them great for catching surface hunters such as bass.
Their unique design and highly-specialized function make popper lures one of the most effective varieties of lure for surface fishing.
While you can find popper lures in most fishing supply stores, you can also make them at home with just a few tools and a bit of effort.
If you want to save money on your lures, or are just interested in the art of lure-making, then making your own popper lures is a great way to step up your fishing game.
This easy-to-follow guide will teach you how to make your own wooden popper lures in just a few short steps!
What Is A Popper Lure?
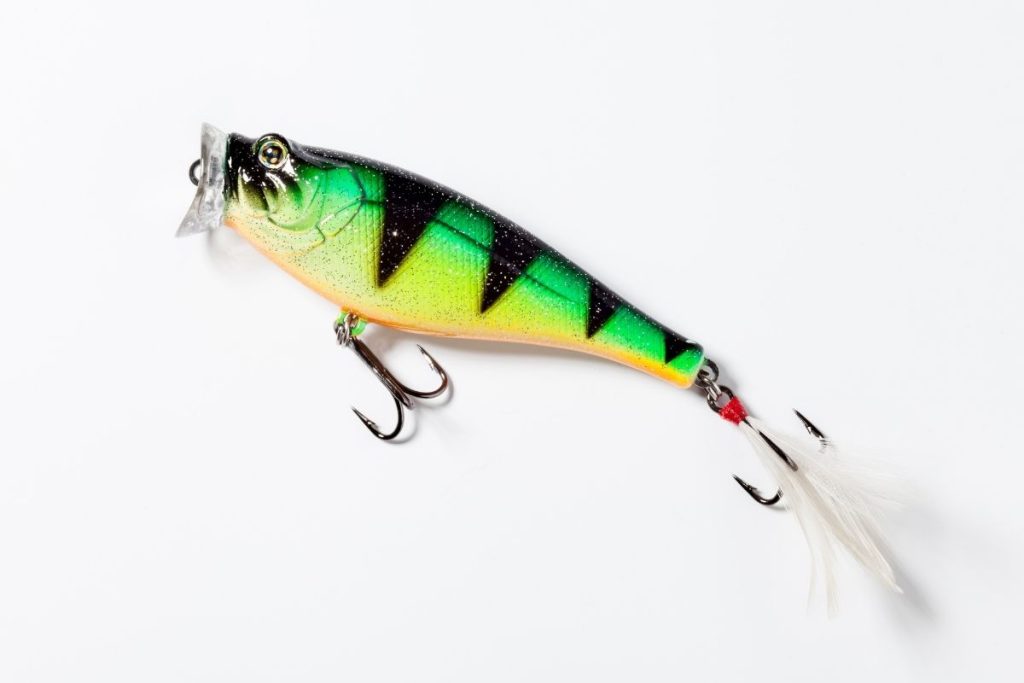
First things first – what exactly is a popper lure? Popper lures are a variety of surface lures, which means they stay at the surface of the water.
Popper lures have a specialized design that affects their movement, which mimics the movement of a struggling insect or bait fish to attract a fish. This happens because of a hollowed-out nose at the front of the lure, which makes a splash and pop sound (hence the name).
Poppers are typically brightly-colored, with patterns that resemble fish, insects, and even frogs. This, combined with the movement and noise the lure produces, makes it incredibly inviting for surface-water hunters to try to grab.
What Do You Need To Make Your Own Popper Lure?
Making your own popper lure might seem like a daunting task at first, but it’s really quite simple. All you need is a few tools and patience.
A lot of these you might already have in a toolbox, though you may need to pick up some extra materials. This list will go through everything you need to gather.
You will need:
- A piece of balsa wood (a piece around 3” x 2” x 2” should be fine for a single lure)
- A template (this is optional, but they are easy to print and can be very helpful)
- A sharp crafting knife
- A pencil
- An electric drill
- 3 mm drill bit
- Rotary burr bit
- Screw eyes
- Fishhooks
- Sandpaper
- Epoxy resin
- Ball sinker/ball bearing
- Paint (for decoration)
How To Make A Popper Lure: A Step-By-Step Guide
With all your supplies gathered, it’s time to start making your lure! Here we’ll take you through each step along the way to making your own homemade popper lure.
1. Mark Your Outline
First, you need to mark out the outline of your lure onto the balsa wood. This is much easier to do with a template, but if you don’t have one you can still make a rough outline.
Popper lures have a shallow curve on top, with an elongated S-shaped underside that is convex at the front and concave towards the ‘tail’. One of the most defining features of a popper lure is their squared noses, so make sure the front of the outline is flat.
The top and bottom profile of these lures is rectangular, and from the front and back they are more rounded; with that said, making your own lures at home gives you some liberty to change up the typical shape of your lure.
As long as you have the squared ends you’ll be fine.
Trace around the template with a pen or pencil, outlining the shape of the lure on each face of the balsa wood.
2. Trim The Basic Shape
Using your crafting knife, start to whittle down the shape of the lure. Don’t go overboard, as you’ll be refining the shape later. You’re always better off trimming too little material than too much.
When you’re first cutting the outline out of your balsa wood, it’s best to leave it blocky. After the initial shape is cut out, use your pencil to draw guidelines on the block to guide you while forming the lure shape.
Using small, deliberate strokes with the knife, carefully shave off the edges of the wood to make it more rounded.
The last thing you want to shape is the ends. When you’ve created the right shape for your lure, square off the face and tail to leave them flat. This will let you create the hollowed nose, and makes attaching the rear hook hanger.
Always cut away from you, as this will reduce the risk of injury if the knife slips. Cutting with the grain will reduce resistance and splinters, making it much easier to carve the wood.
3. Sand Down The Lure
With the balsa wood carved into the lure, you need to finish off shaping it with some sandpaper. Use a square sanding block or loose sheet of sandpaper for the top and sides of the lure, and a curved one for the underside.
Smooth down the surface of the lure, and wear down the soft balsa wood to get it into the final shape. Taper the back half of the lure as it goes into its ‘tail’, as this should be thinner than the front of the lure.
Again, be careful not to sand down too much as this will leave the lure unusable.
4. Mark Where To Drill
While you may have successfully shaped the lure, it’s not going to be useful in its current state. If you want to use your lure, you need to attach some pieces.
But the placement of these can be important, so you’ll need to mark their places first. You can use a template to mark out each placement, but it’s also possible to line it up by eye.
Start by drawing a central line along the top of the lure in pencil. From there, you can mark where the hook hangars, weight, and tow point will go.
Mark a spot around 1/3 of the way down the bottom of the lure for the weight. Next, make a mark for the two hook hangars; one will go around 2/3 of the way down the bottom, and the other will be on the tip of the lure’s tail.
Finally, draw a mark 1/4-1/3 of the way along the top of the lure for the tow point, and draw an X as centrally on the front face as possible to mark for the hollow.
5. Drill Then Attach The Hardware
The ‘hardware’ of the lure are the small pieces added to make it function. These include a weight to keep the lure in the right position, and loops to attach the hooks and fishing line to the lure.
Using a 3 mm drill bit, carefully drill through each of the markings you drew on the lure. Take care to be as central as possible, so the lure stays balanced and even.
The hole for the weight may need to be larger, and you can use a 5 mm bit if necessary.
To make the popper lure’s iconic hollow nose, use the rotary burr to gently carve away a dip in the front of the lure.
Take it slowly, making sure the hollow is as even as possible, and rotate the lure to keep the nose from becoming lopsided.
Now it’s time to attach the hardware. Insert your screw eyes into the holes you drilled for the hook hangars and tow point, and secure them with epoxy resin. Then, insert the ball sinker and add more resin to keep it in place.
6. Add Some Protection
You can make a simple protective layer for your lure by coating it in a solution of watered-down resin. Warm the wood up beforehand, and make sure the resin is thin enough to brush on.
Paint the surface of the lure with your resin. This will soak into the warm wood quickly, so make sure you add several coats. When the resin dries, your lure will be waterproof and much tougher, ready to survive the elements.
7. Decorate
A good lure has a good paint job, and this final step gives you all the creative freedom you could want. As mentioned earlier, popper lures are painted in bright colors and are patterned like insects and small fish.
These are good starting points, but feel free to experiment. After all, you want the lure to be attractive to fish, so make the lure as eye-catching as you want.
For the best results, you should use an airbrush. However, these can be expensive; luckily, auto paint and acrylics are just as effective and are much cheaper.
When you’re done painting your lure, congratulations: your new, homemade popper lure is complete!
Final Thoughts
Making your own lures at home is a great way to be creative and add a personal touch to your fishing experience.
It doesn’t have to take long or cost much money to get started, and once you’ve mastered the basics, you’ll find yourself experimenting with different designs and materials.
If you’re interested in making your own popper lure, then simply follow these instructions, and you’ll have a great lure ready in no time. Good luck!
Tyger Leader is reader-supported and may earn a commission when you book or purchase using our links. Learn more about our affiliate disclaimer here.